Blacksmithing: The Black Art
A good friend of mine, who is a traditional blacksmith in South Carolina, had asked me to take pictures of his shop and of him working. A photo opportunity I couldn’t pass up on.
The Blacksmith Shop
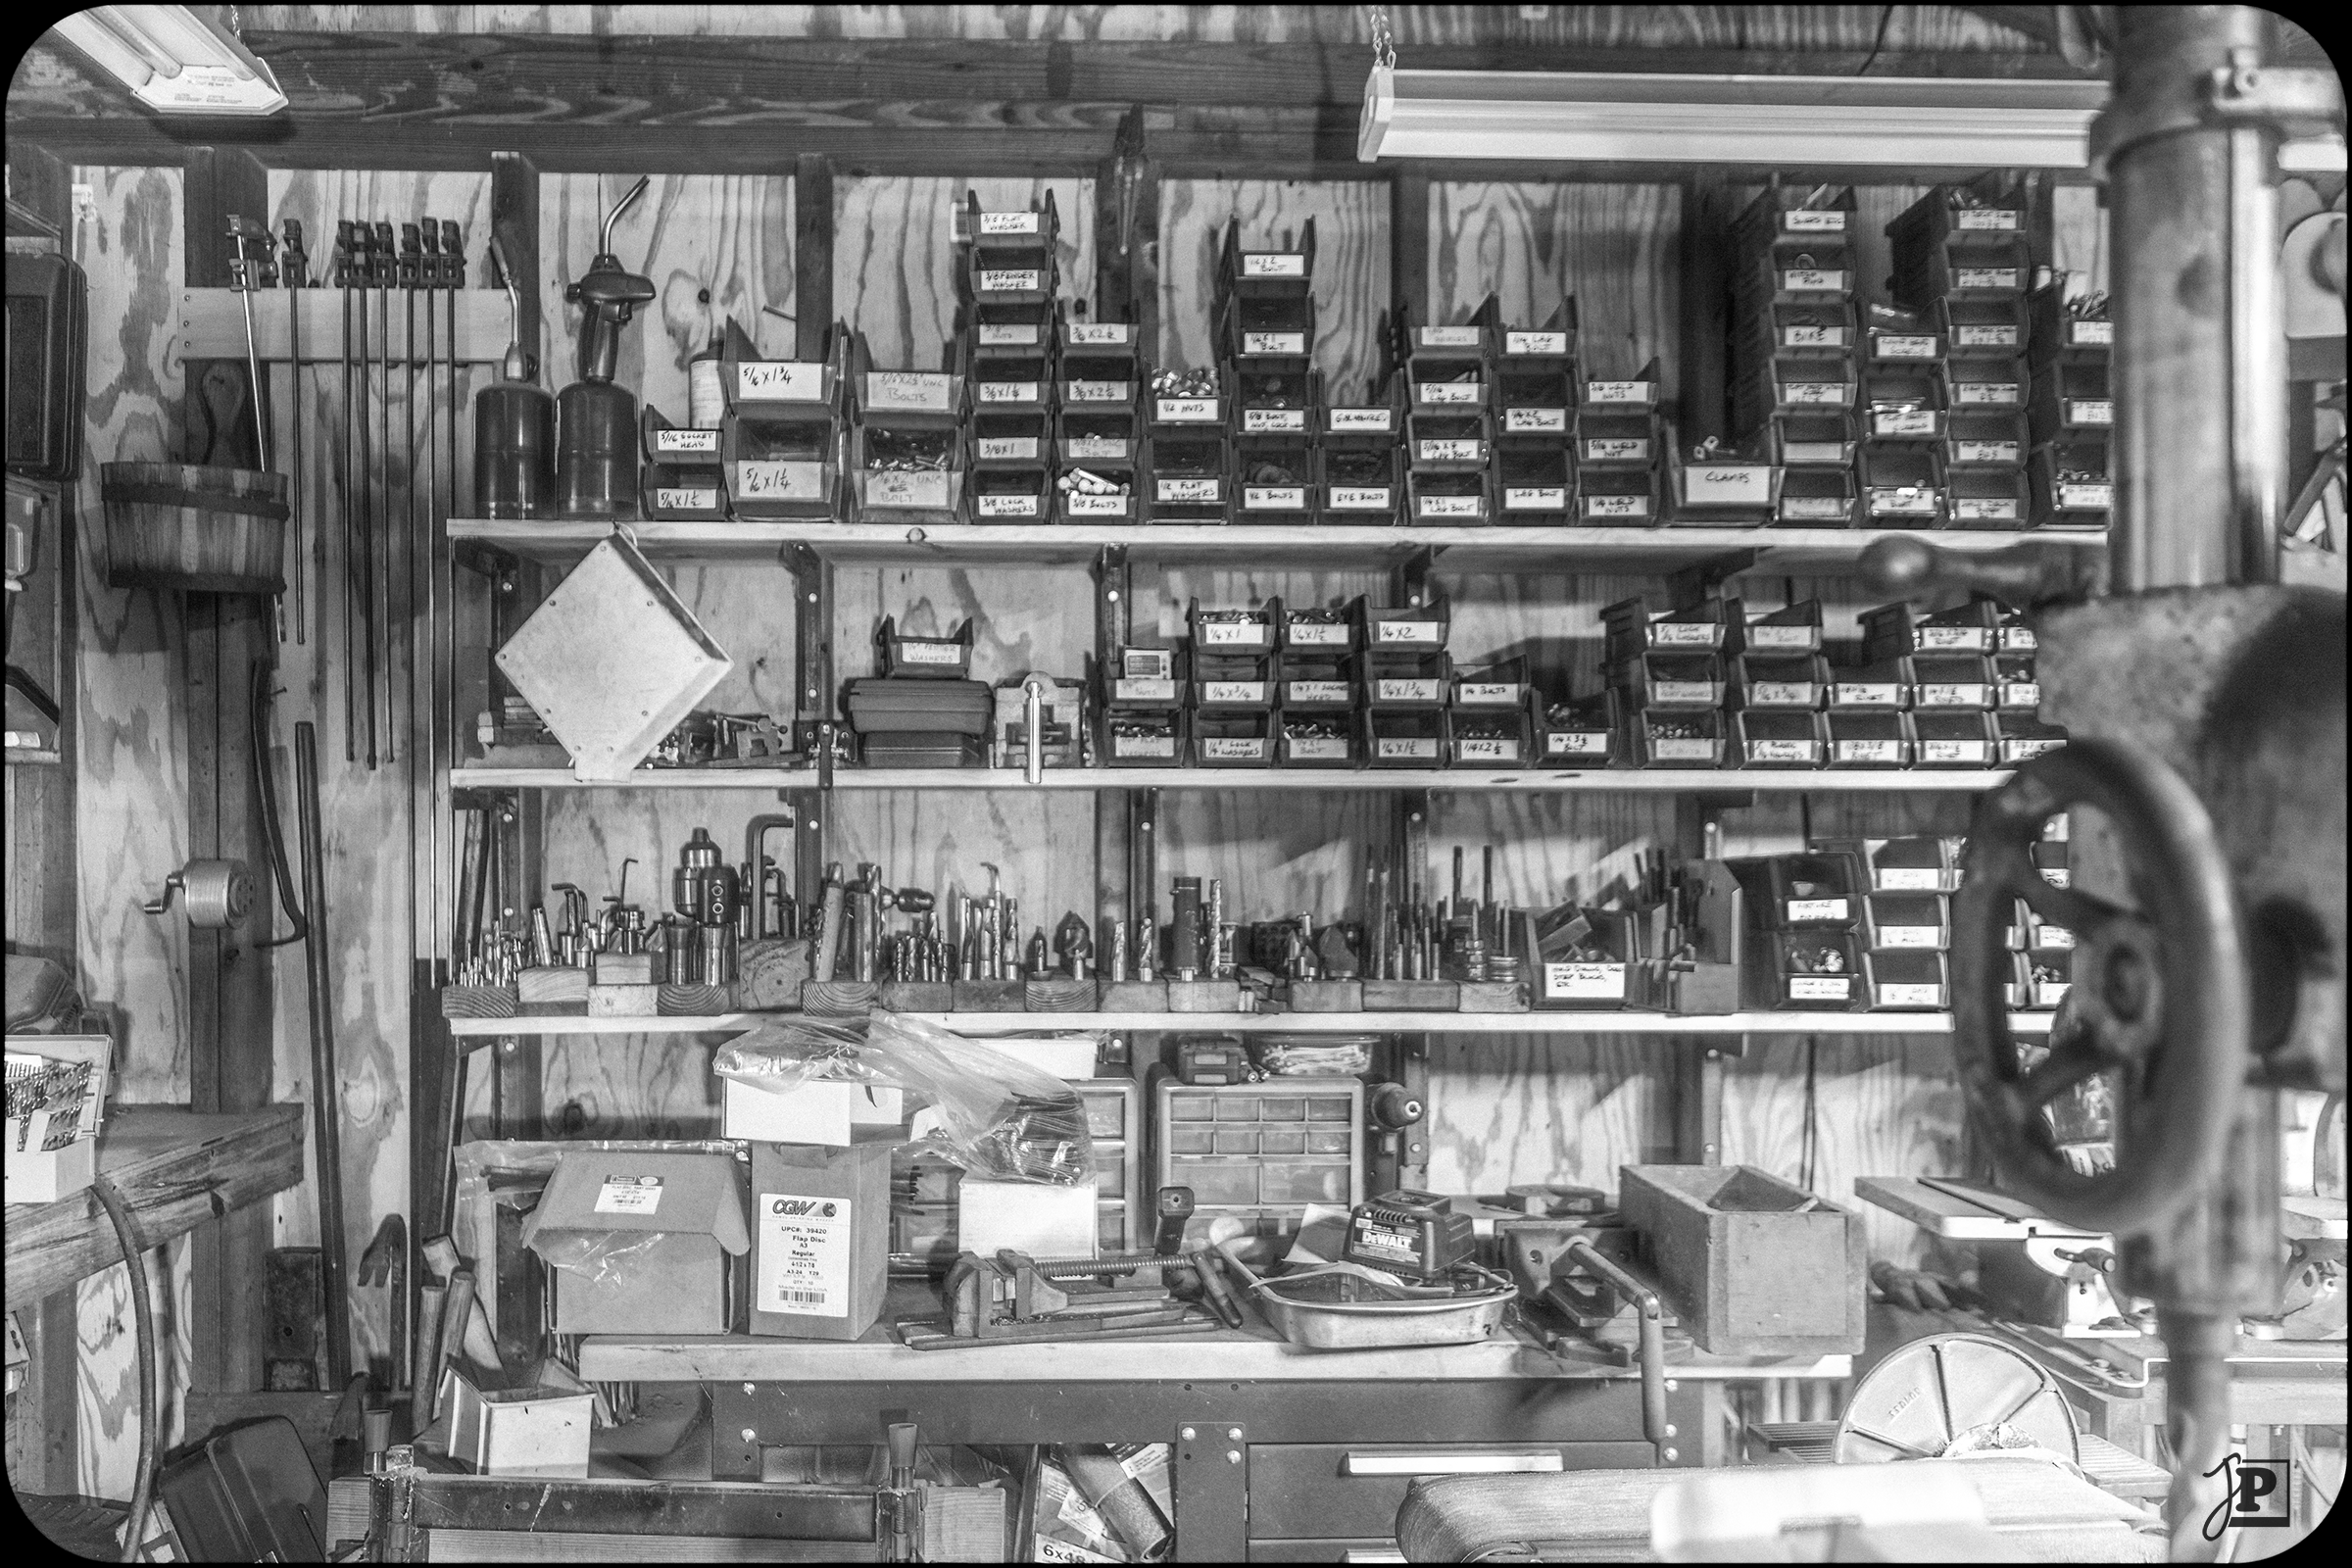
Phil’s shop, also known as the PAR Ironworks Institute (PARII), can be found in the backyard of a small town not too far away from Charleston, SC. I have known Phil for more than twenty years now. We met through work while facilitating international projects, and joint effort soon turned into friendship. I’ve been to his house and shop many times, and I am proud owner of several hand-forged bottle openers and trivets he made.
PARII is somewhat of a treasure trove and a time machine. There always is an abundance of parts, tools, machinery, and work-in-progress items. I like just standing there, letting my eyes wander and take it all in. My Dad was a lathe operator and often told me about his work when I was a kid, so being in Phil’s shop brings back those memories.
In 2016, about a year after I started getting more serious with my photography, Phil asked me to bring my camera on my next trip to the States, as he wanted some photos of his shop and of him working. I was more than happy to comply. So, I packed my camera, a few lenses, filters, external flashes, and a travel tripod for the few days I spent at his house after our business meetings were over.
Before we get to the photography part, though, I’ll let Phil tell a little about himself and how he got into blacksmithing.
I started blacksmithing in the late 1970’s. My best friend and roommate worked at the Deane Forge in Colonial Williamsburg. I would go by and visit him often and I loved how the hot iron and steel could be forged into intricate shapes with just a hammer and anvil. When a job became available in the shop I jumped at the chance. A few years later I started my own blacksmith shop which I ran for a number of years. I now only blacksmith part time while working in the IT industry. My forged products include house hardware such as latches and pulls, hinges, and shutter dogs. I also make kitchen utensils such as spatulas and ladles. My greatest enjoyment comes from making tools for other craftsmen such as hammers, chisels, hatchets, and also tools for other blacksmiths such as tongs.
One thing I like in particular about the shop is the atmosphere it carries. It’s like a small world in itself where weather, time, and any problems there might be in the outside world simply don’t matter. Instead, the things in here have a character of their own and invite the observer to a kind of Time Travel just like the Railway Museum does. I wanted to convey this in my photos, so from the beginning I was planning on giving them a vintage look and feel. In the image below, for instance, I muted the colors a bit, enhanced the reds, and raised the black point to give a slightly faded appearance.

Speaking of the Railway Museum, its motto is a quote which has been attributed to, among others, Thomas More and Benjamin Franklin: “Tradition is not to preserve the ashes but to pass on the flame.” It applies here just as well. It’s the forge fire that makes the photo look alive, that conveys the feeling that something is about to happen, and this is not just a still life with some, possibly forgotten, tools.
The forge is in the rear of the shop, on the far side from the windows. I wanted to preserve some shape in the flame, so I had to use a fast shutter speed. This made it necessary to supplement the ambient light with external flashes. I positioned them in near the windows, so that the shadows they cast are in the right direction and used a wireless remote trigger. The wide aperture ensures that enough light from the fire is captured, and it also provides some depth to the scene.
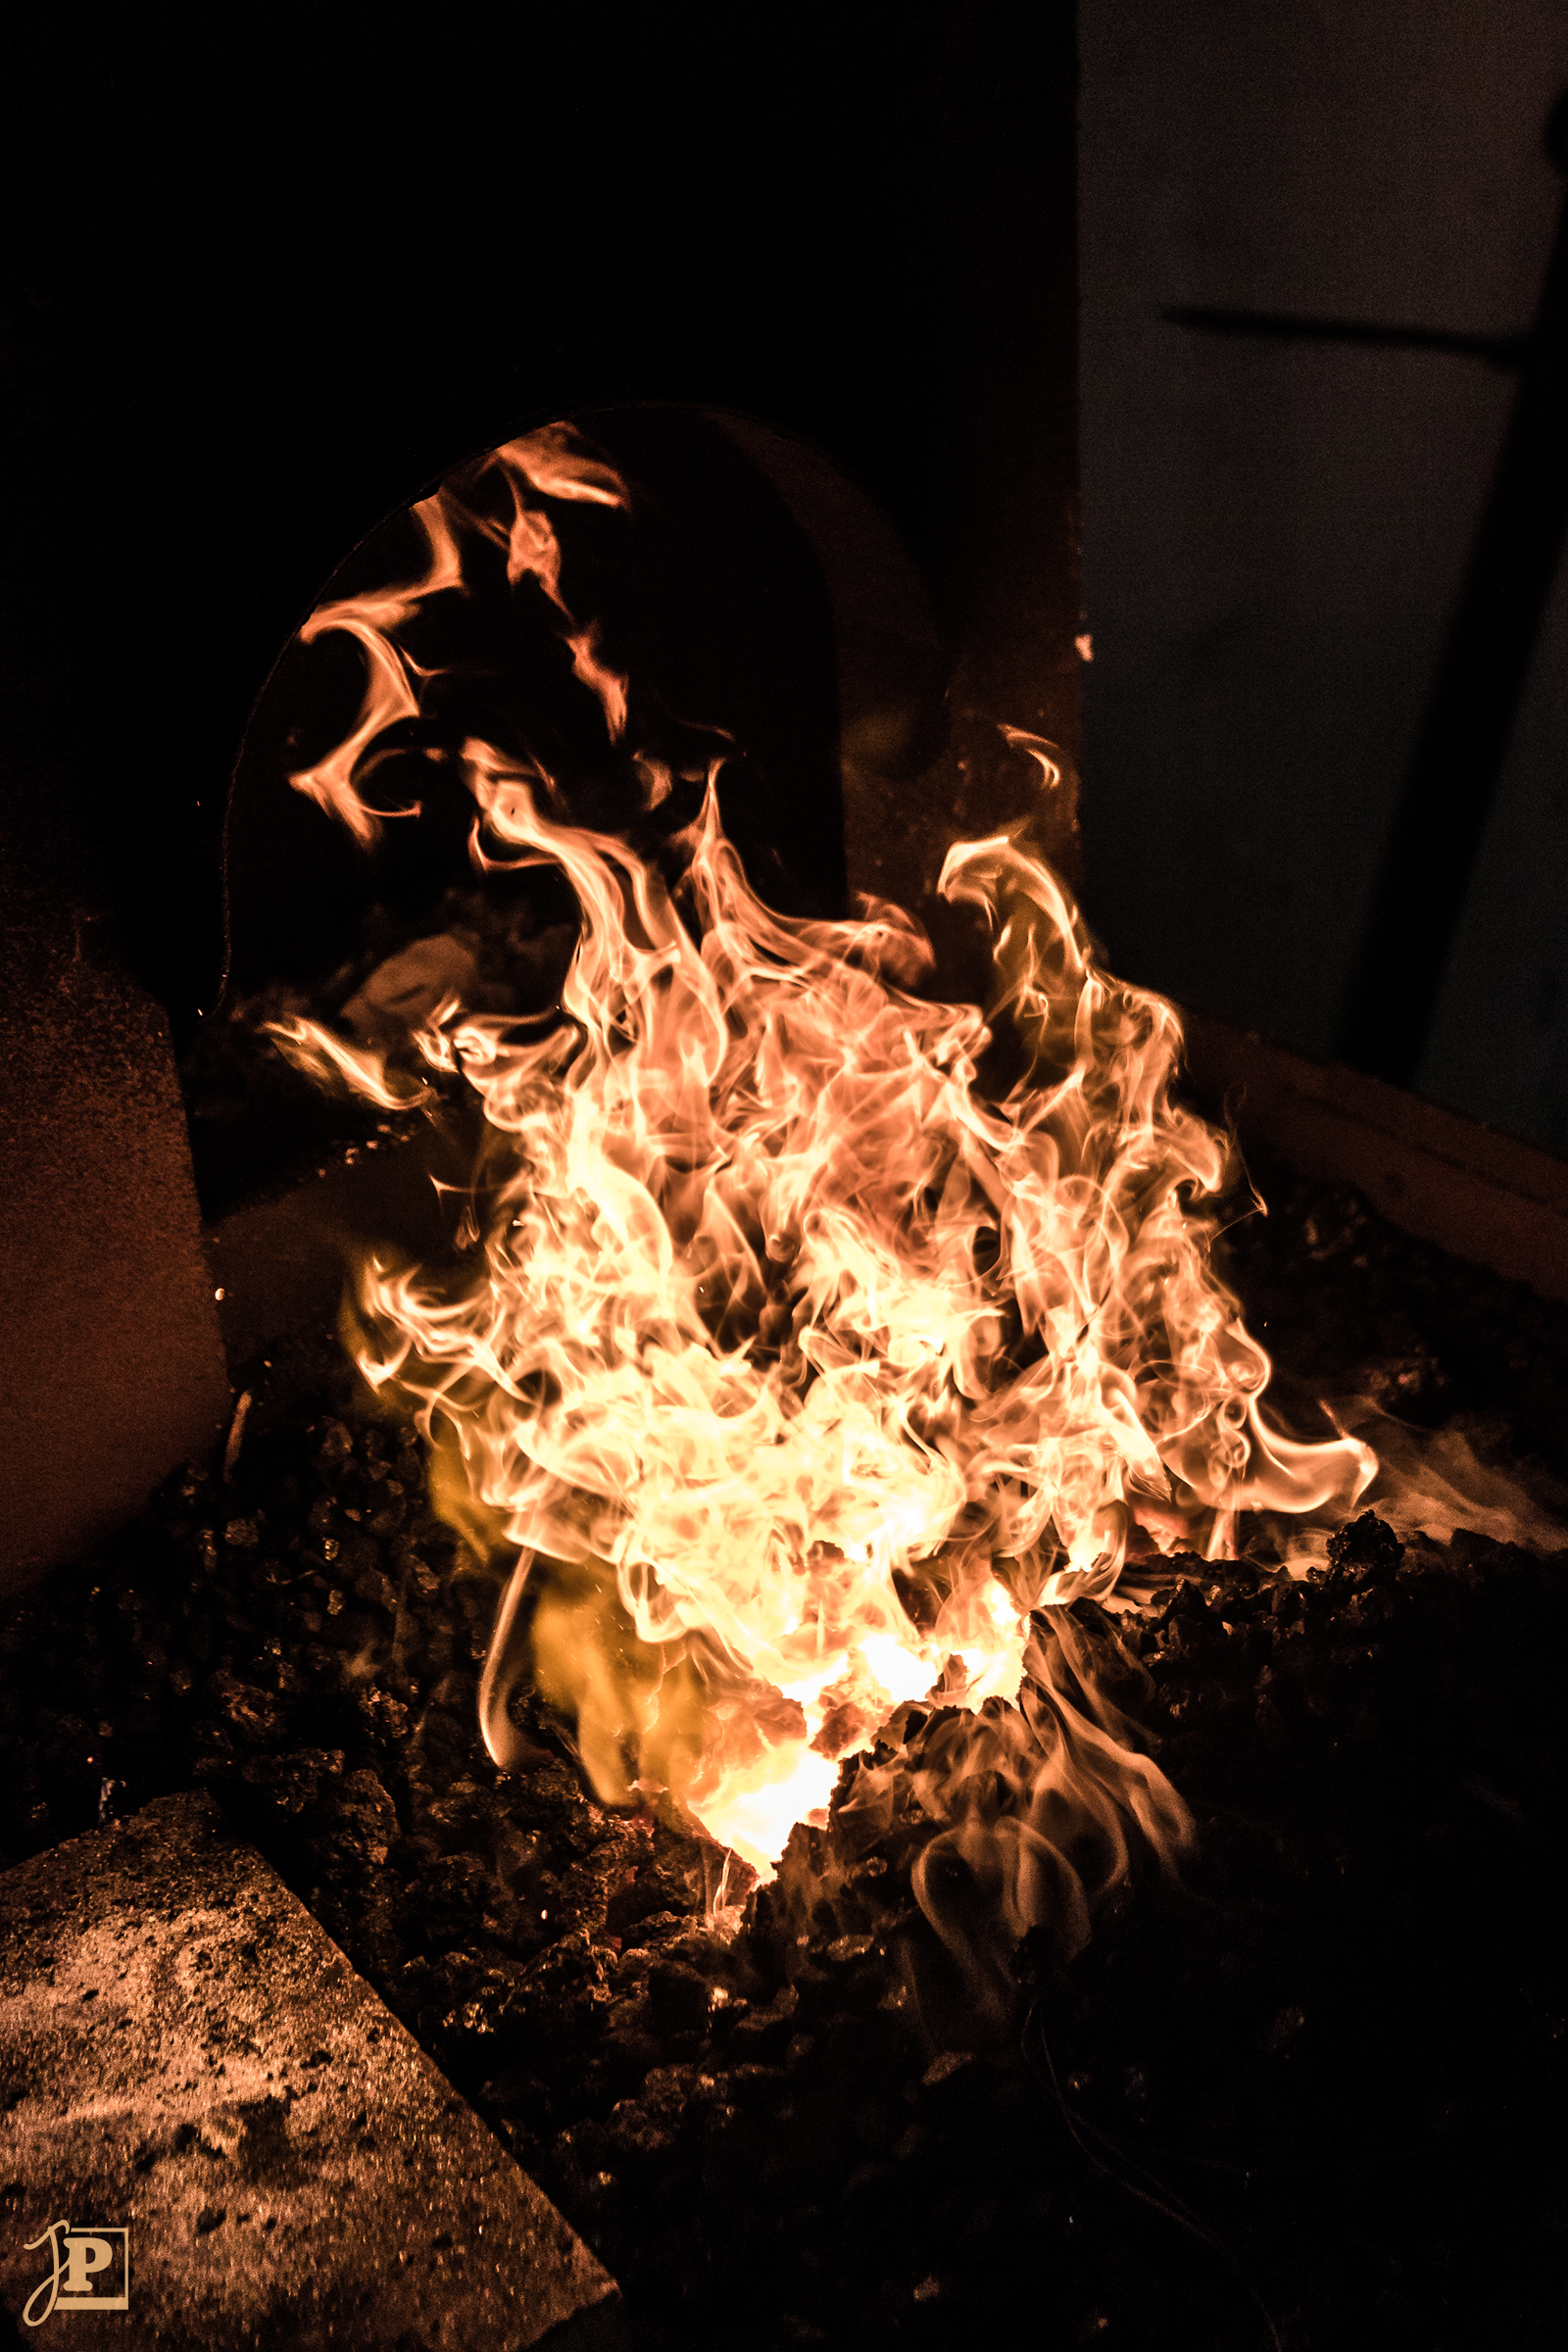
Photographing fire is very challenging, since the differences in brightness between the hottest area near the bottom and the tips of the flames are quite extreme. Also, the camera’s automatic exposure completely fails here. It took some tinkering with the manual settings until I was satisfied with the result. My main priority here was using the shortest exposure time my camera supported, to freeze the motion of the flames and capture the elusive structure of the fast-burning fire.
Getting to Work
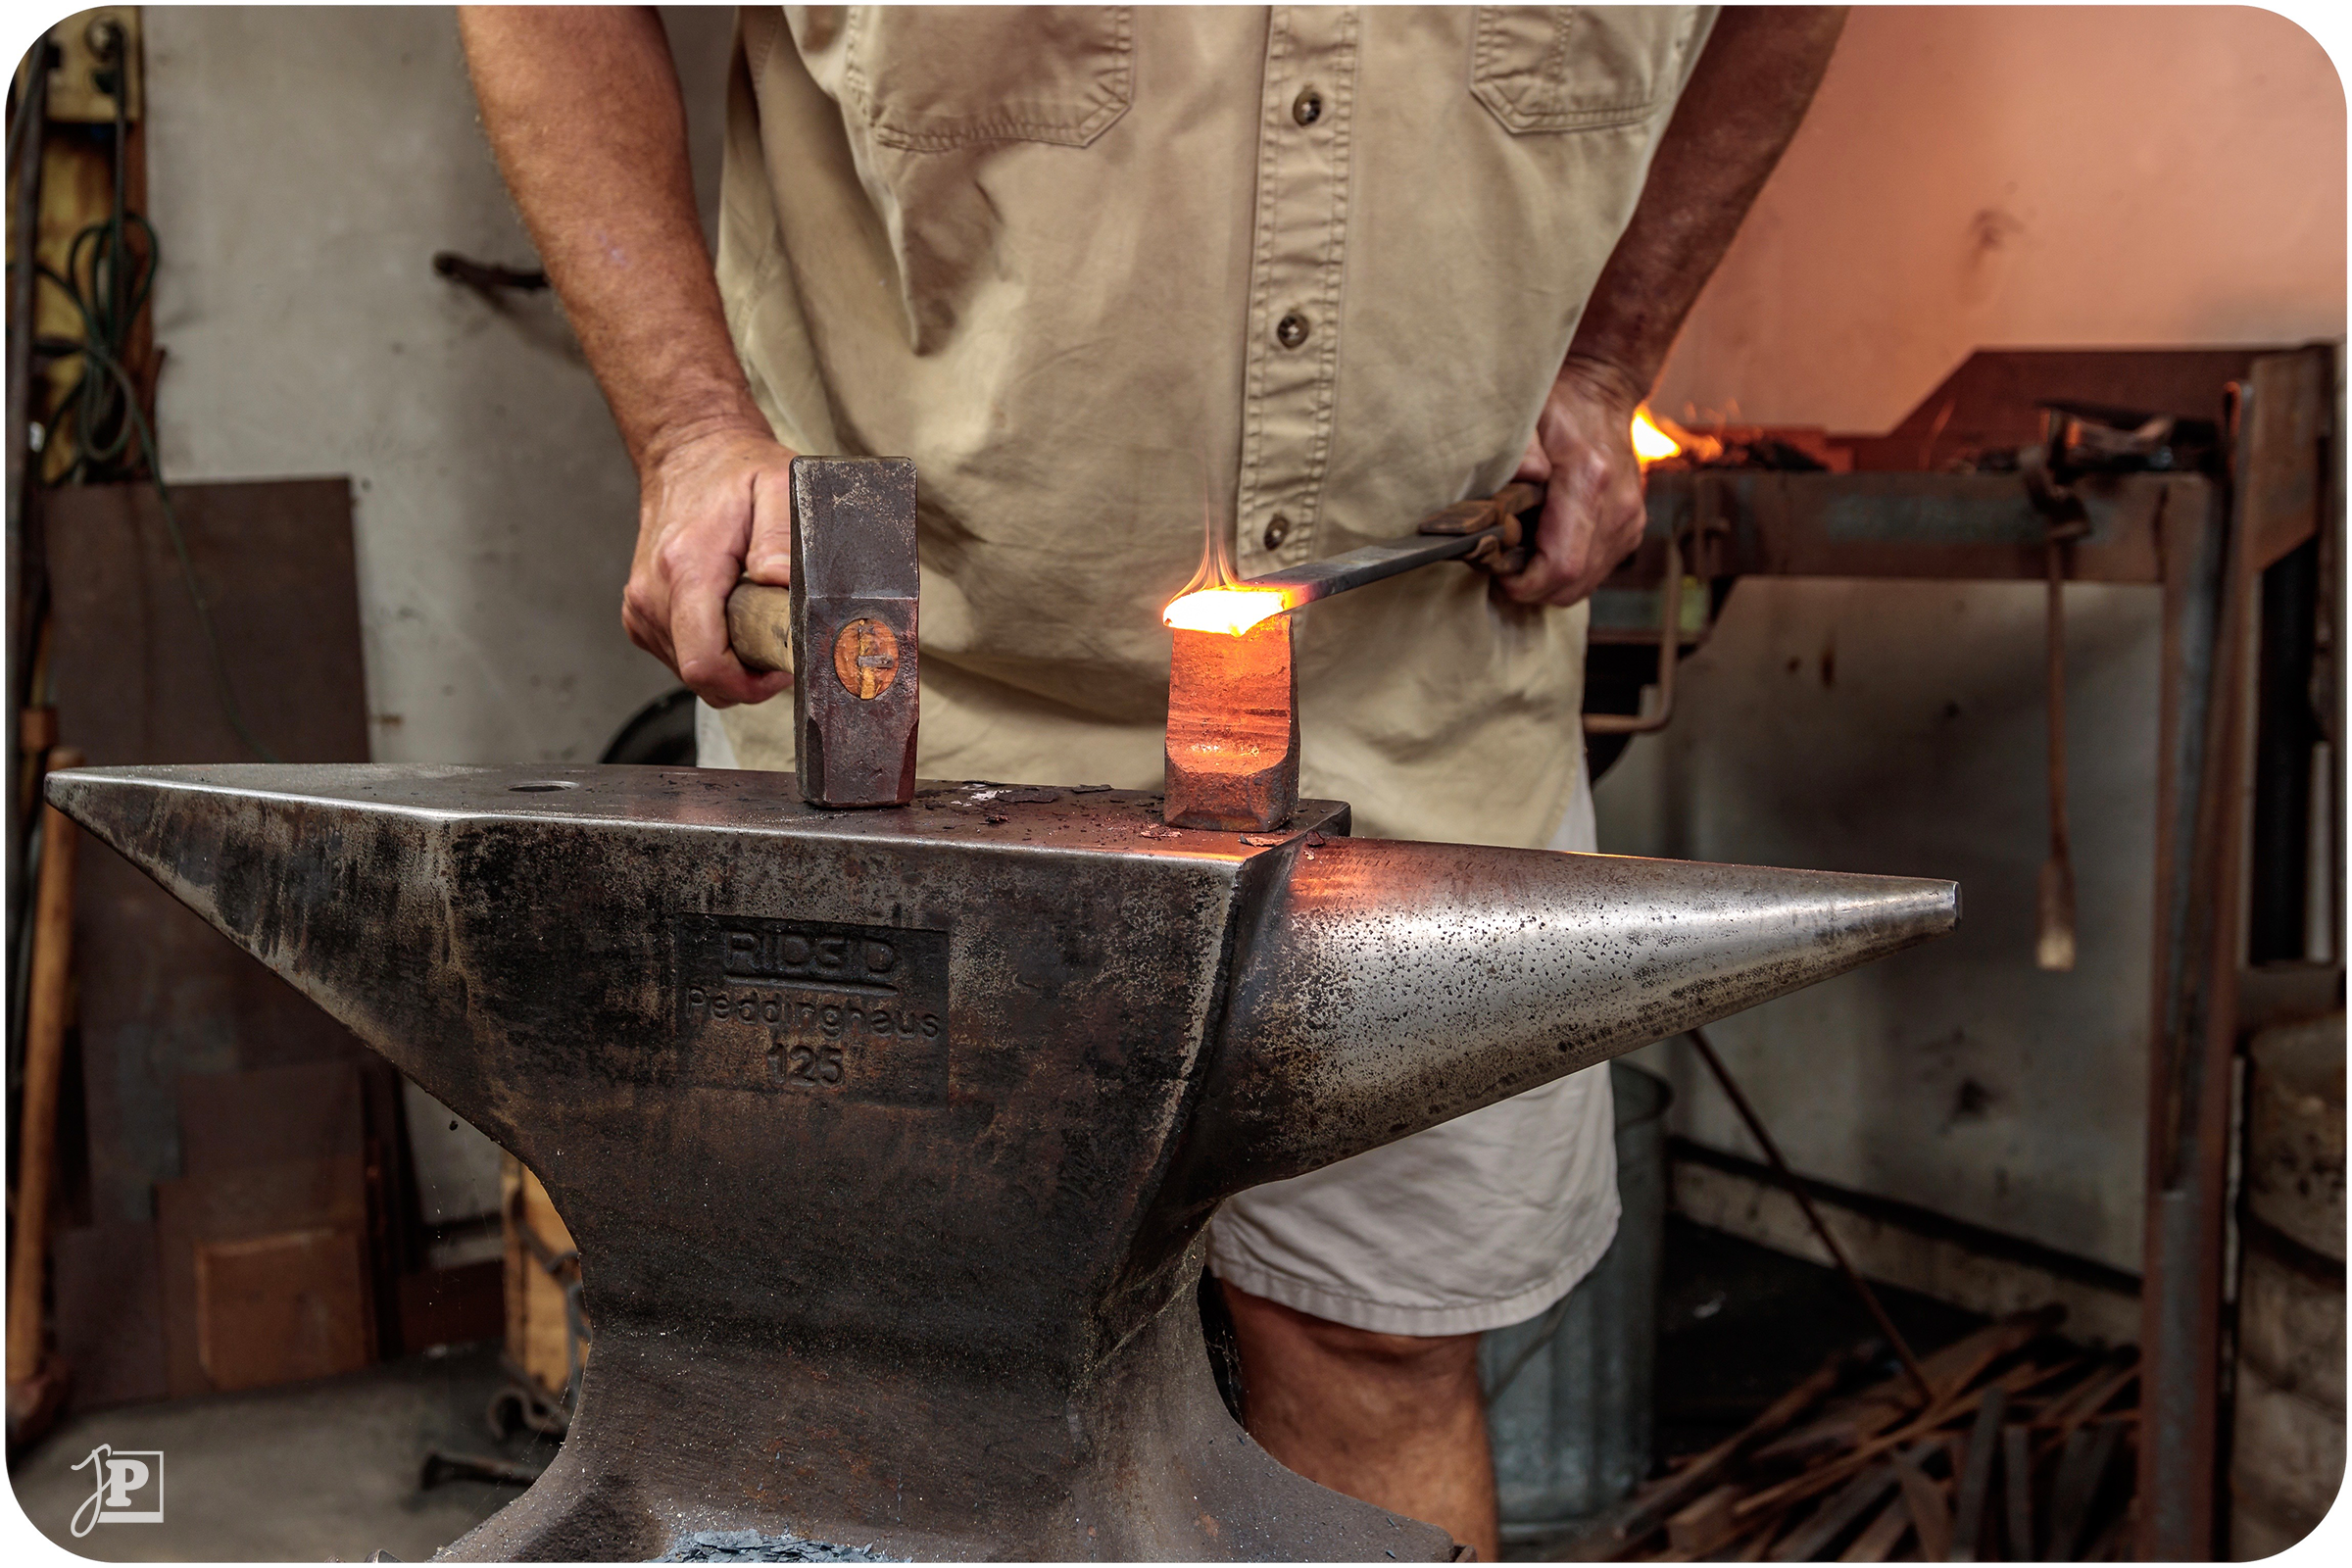
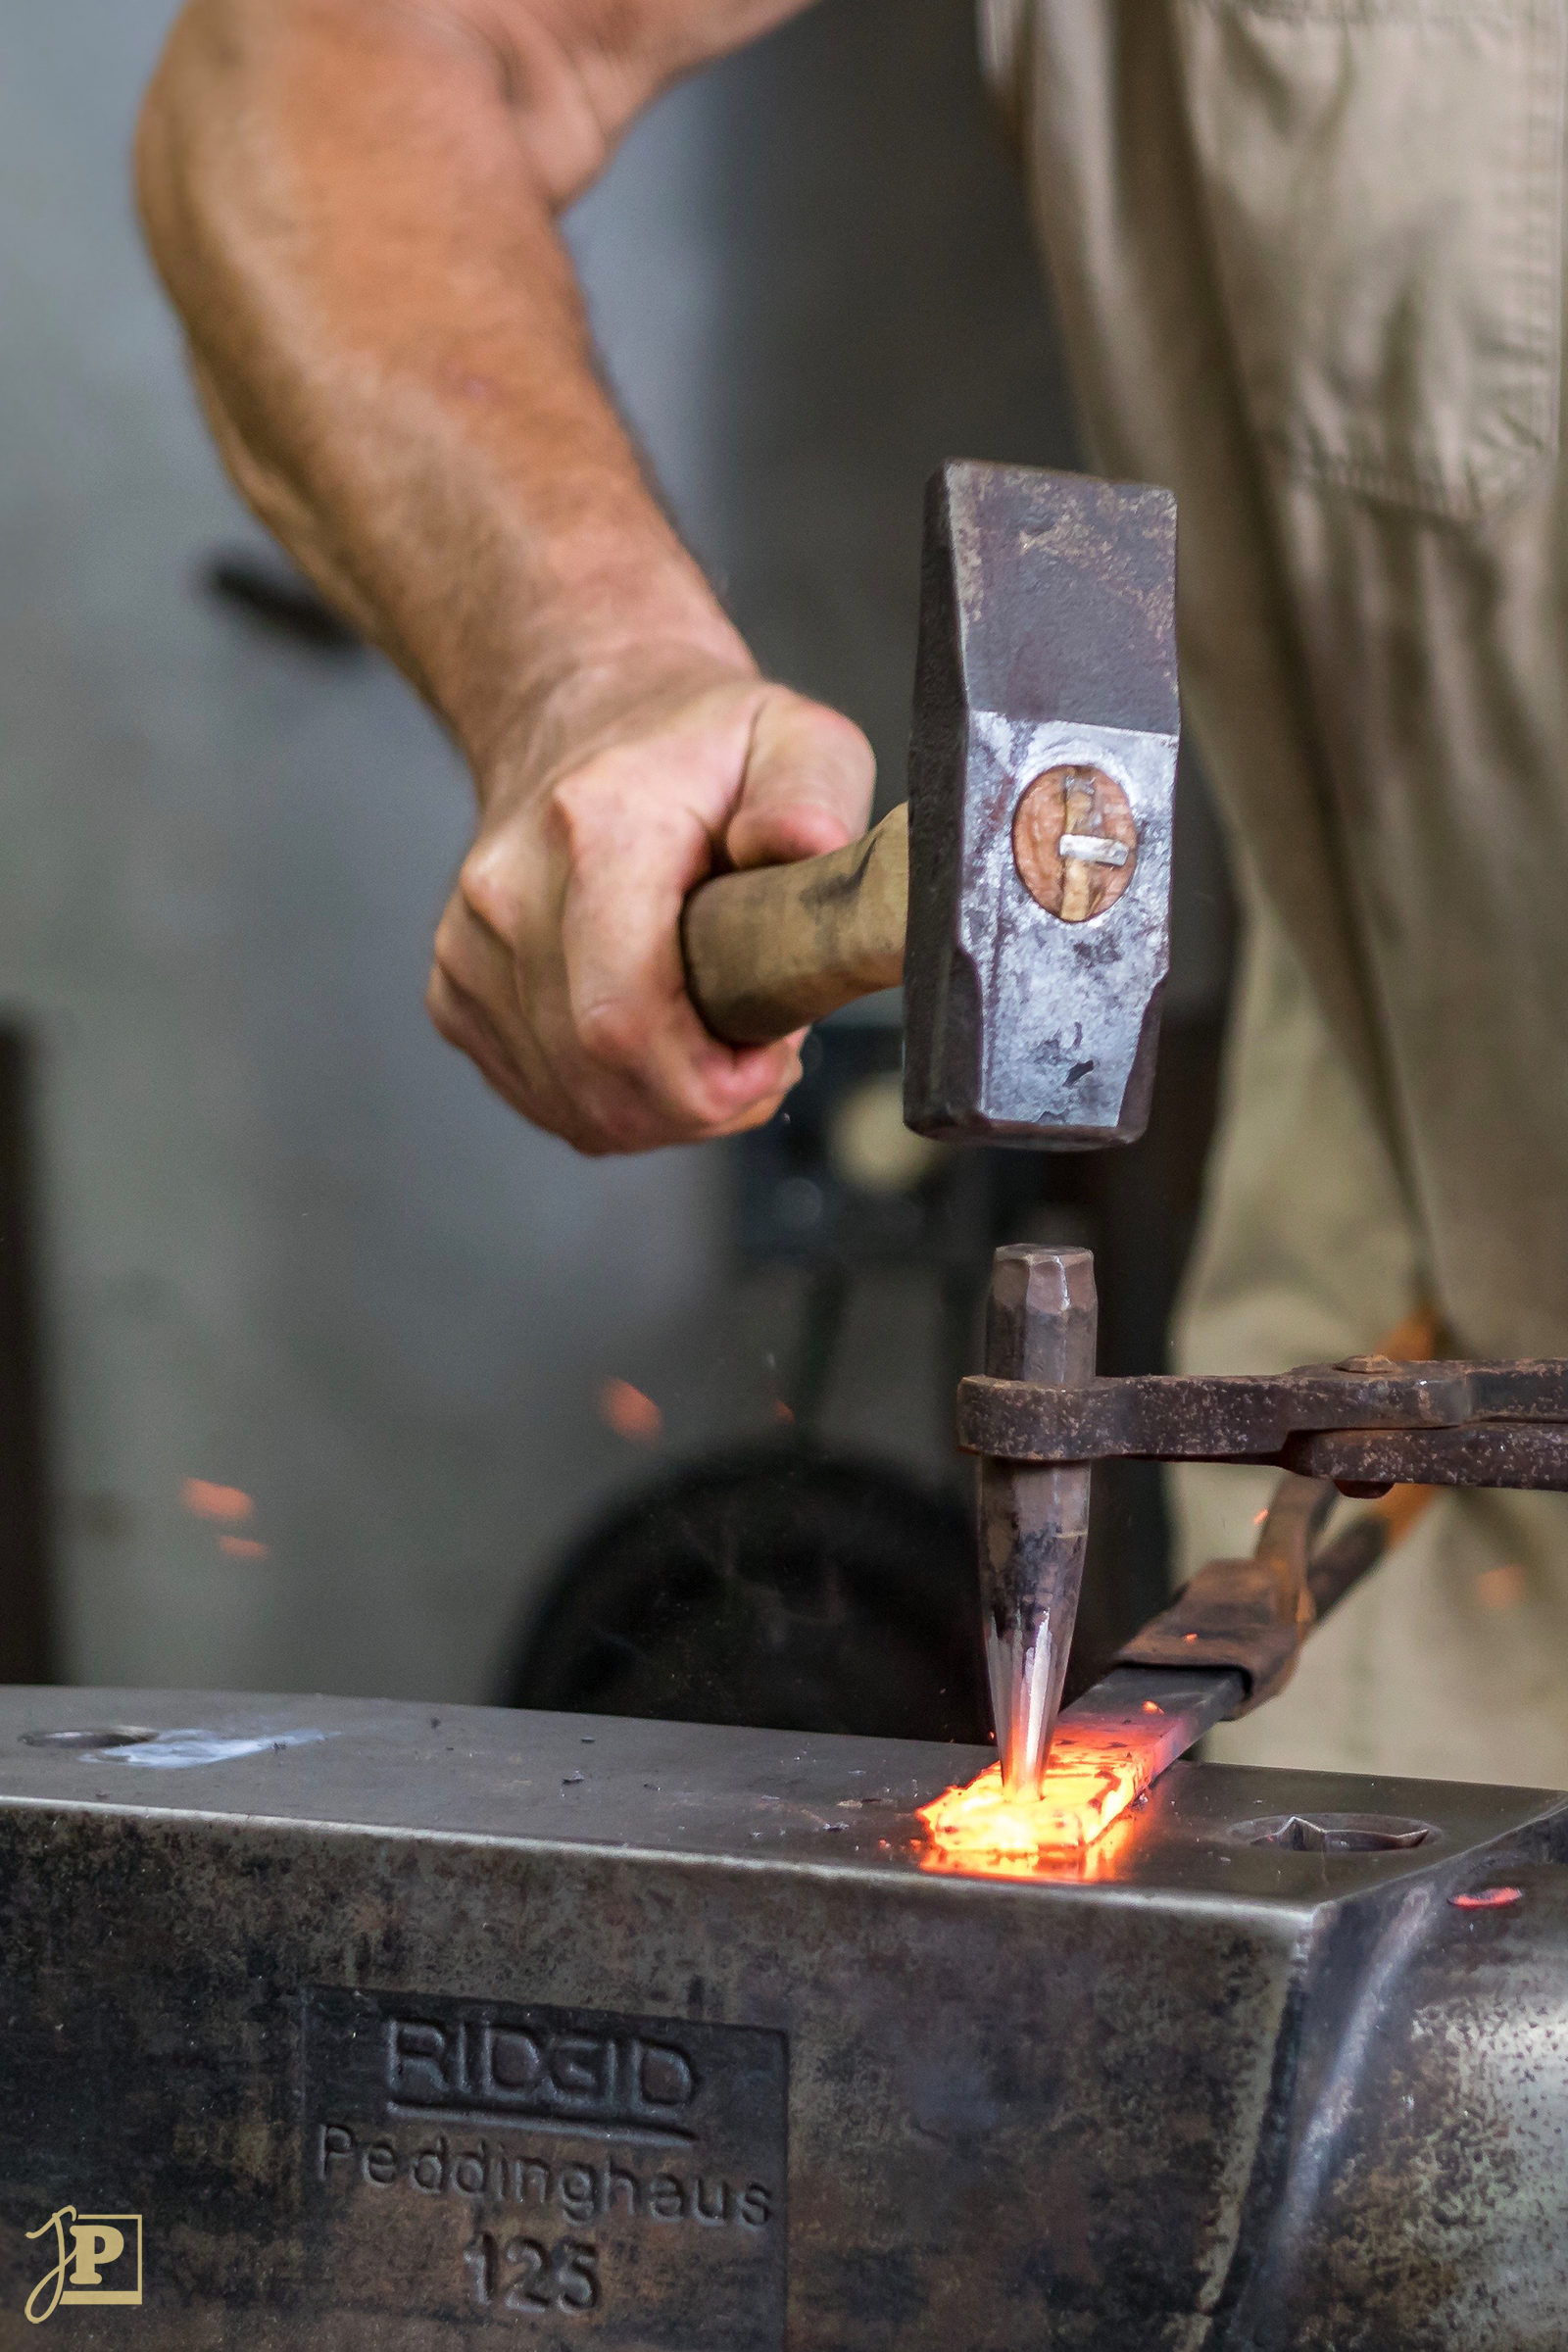
Once the fire was hot enough, it was time to get to work. I kept my flashes set up to add to the ambient light and help with faster shutter speeds to minimize motion blur. I used a 18-35 mm wide-angle zoom lens as well as a standard 50 mm prime lens on my Canon Rebel T6s and moved around the shop, trying to find different perspectives. The main challenge was balancing the brightness of the glowing steel and the fire in the background with the surrounding scene.
The little detail that I find most captivating about the next photo are the flames coming off the steel. As for what is being worked on here, and how, I’ll once again let Phil provide some background:
As I said earlier, the thing that interested me about blacksmithing from the start was how malleable the steel and iron are when hot. You can cut it easily with an anvil mounted cutter called a “hardy cutter”. It easily can be bent and curved into a decorative scroll. And, you can punch a hole through it with little effort.
Forge Welding
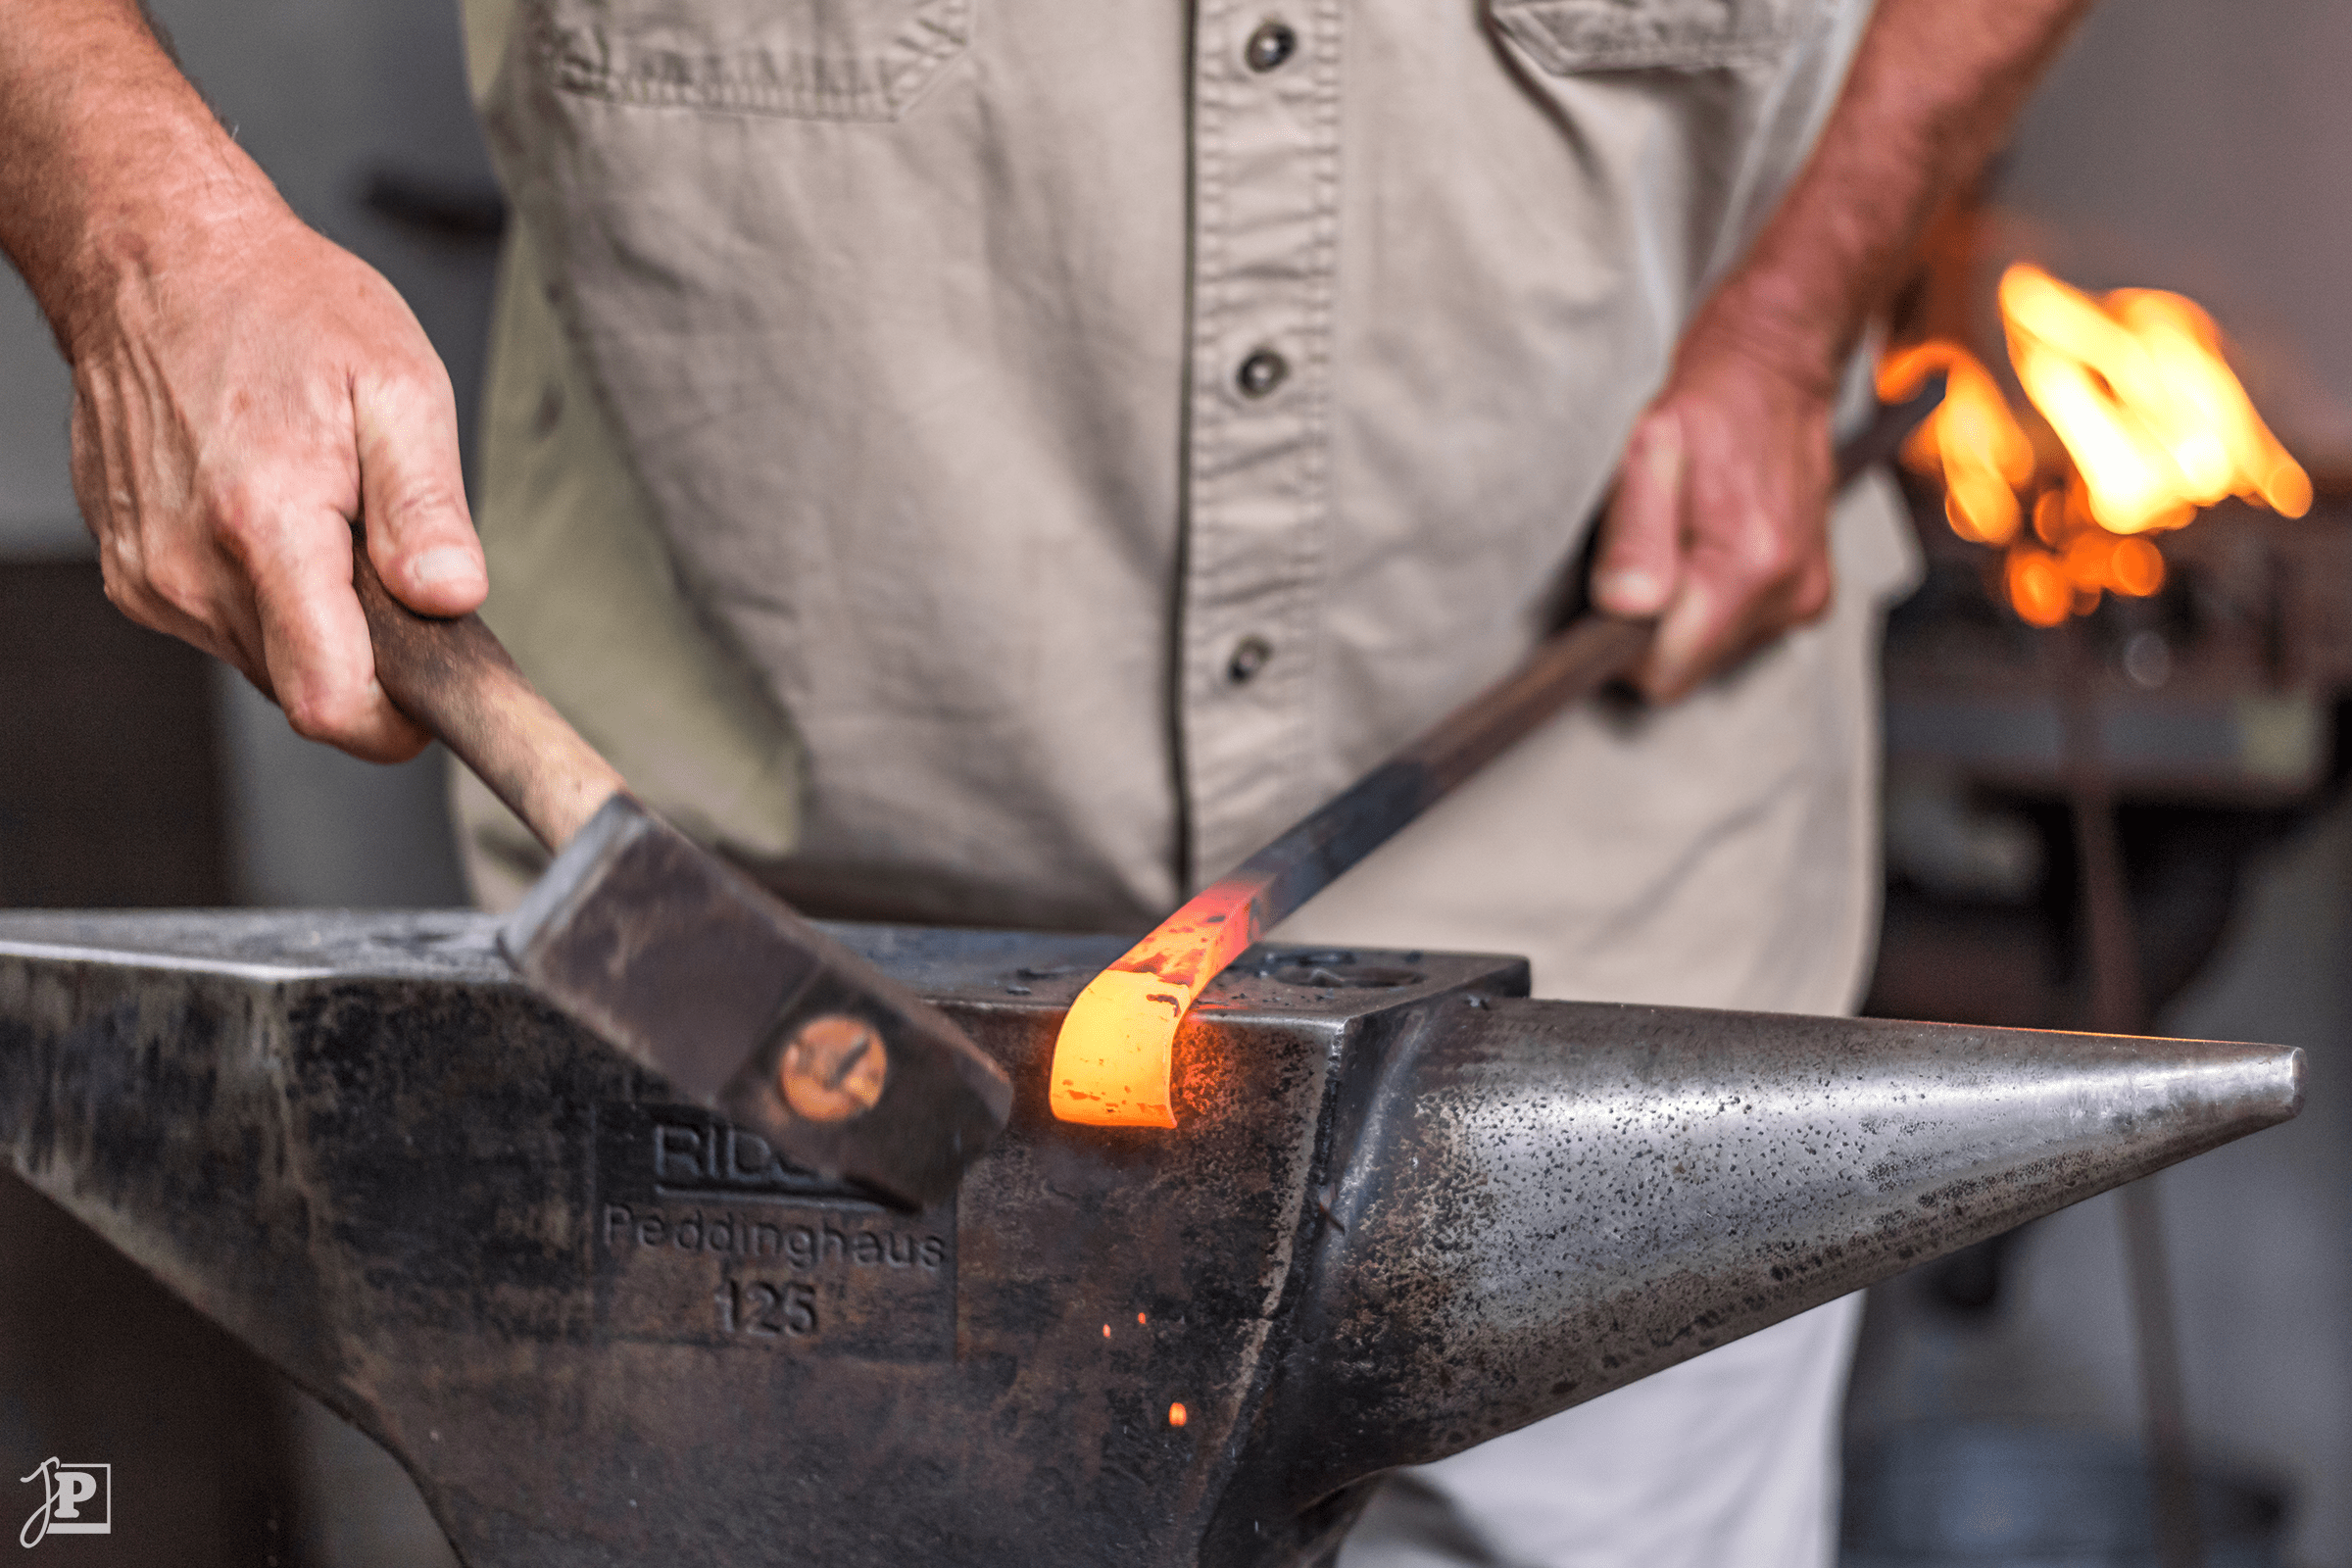
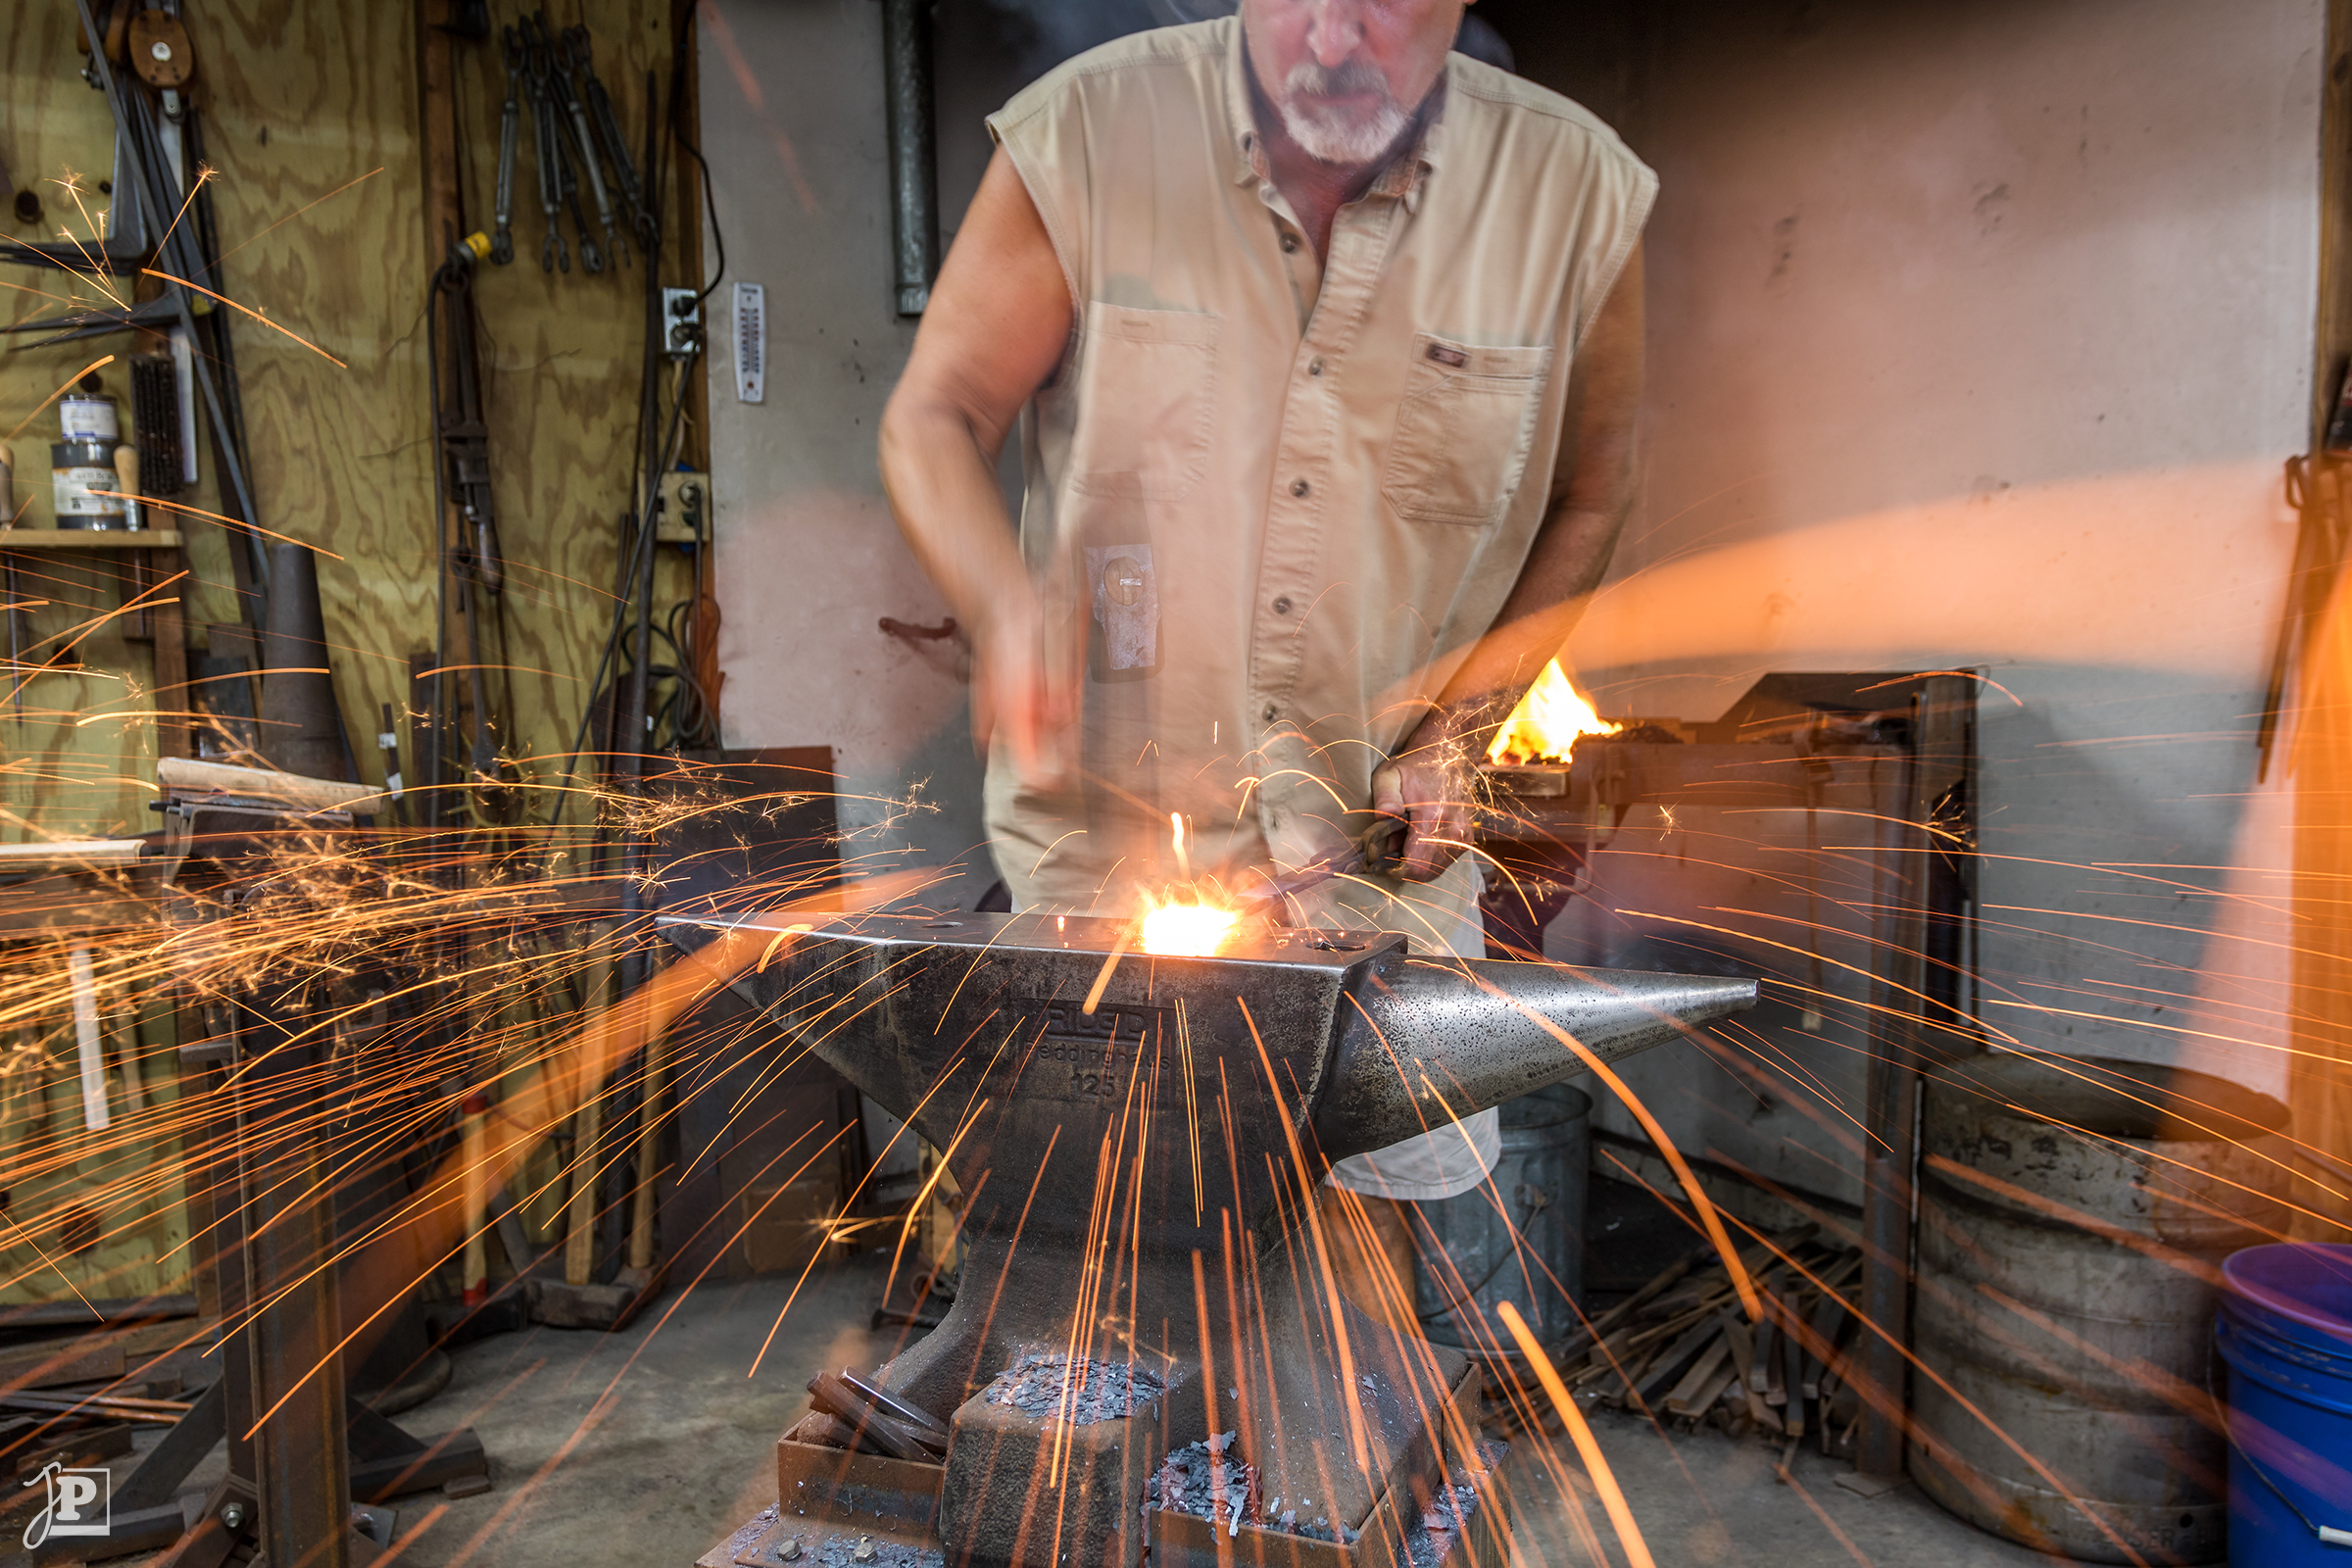
One specific photo idea that Phil had was trying to capture the sparks flying when doing a forge weld:
The use of iron and forge welding has been around for thousands of years. Before there was electric and gas welding of steel and iron either forge welding or traditional joinery methods (mortise and tennon, riveting) were used to fasten two pieces together. The basic process is to heat up the steel or iron to a nice yellow color, add flux (borax and iron filings), slowly heat up the material to welding temperature (2,000 °F), quickly bring them out of the fire to the anvil, and hammer them together.
We had discussed this in advance and concluded that the main objective of these photos – the hot sparks flying off in all directions – also came with some risk: they could easily damage the front element of my lens. Thus, I brought along an inexpensive UV filter as a means of protection.
To capture the motion of the sparks, a slightly longer exposure time is needed. After a few test shots, 1/10thof a second rendered the most promising results. I put the camera into continuous shooting mode and let it take a burst of photos while Phil repeatedly hit the work piece.
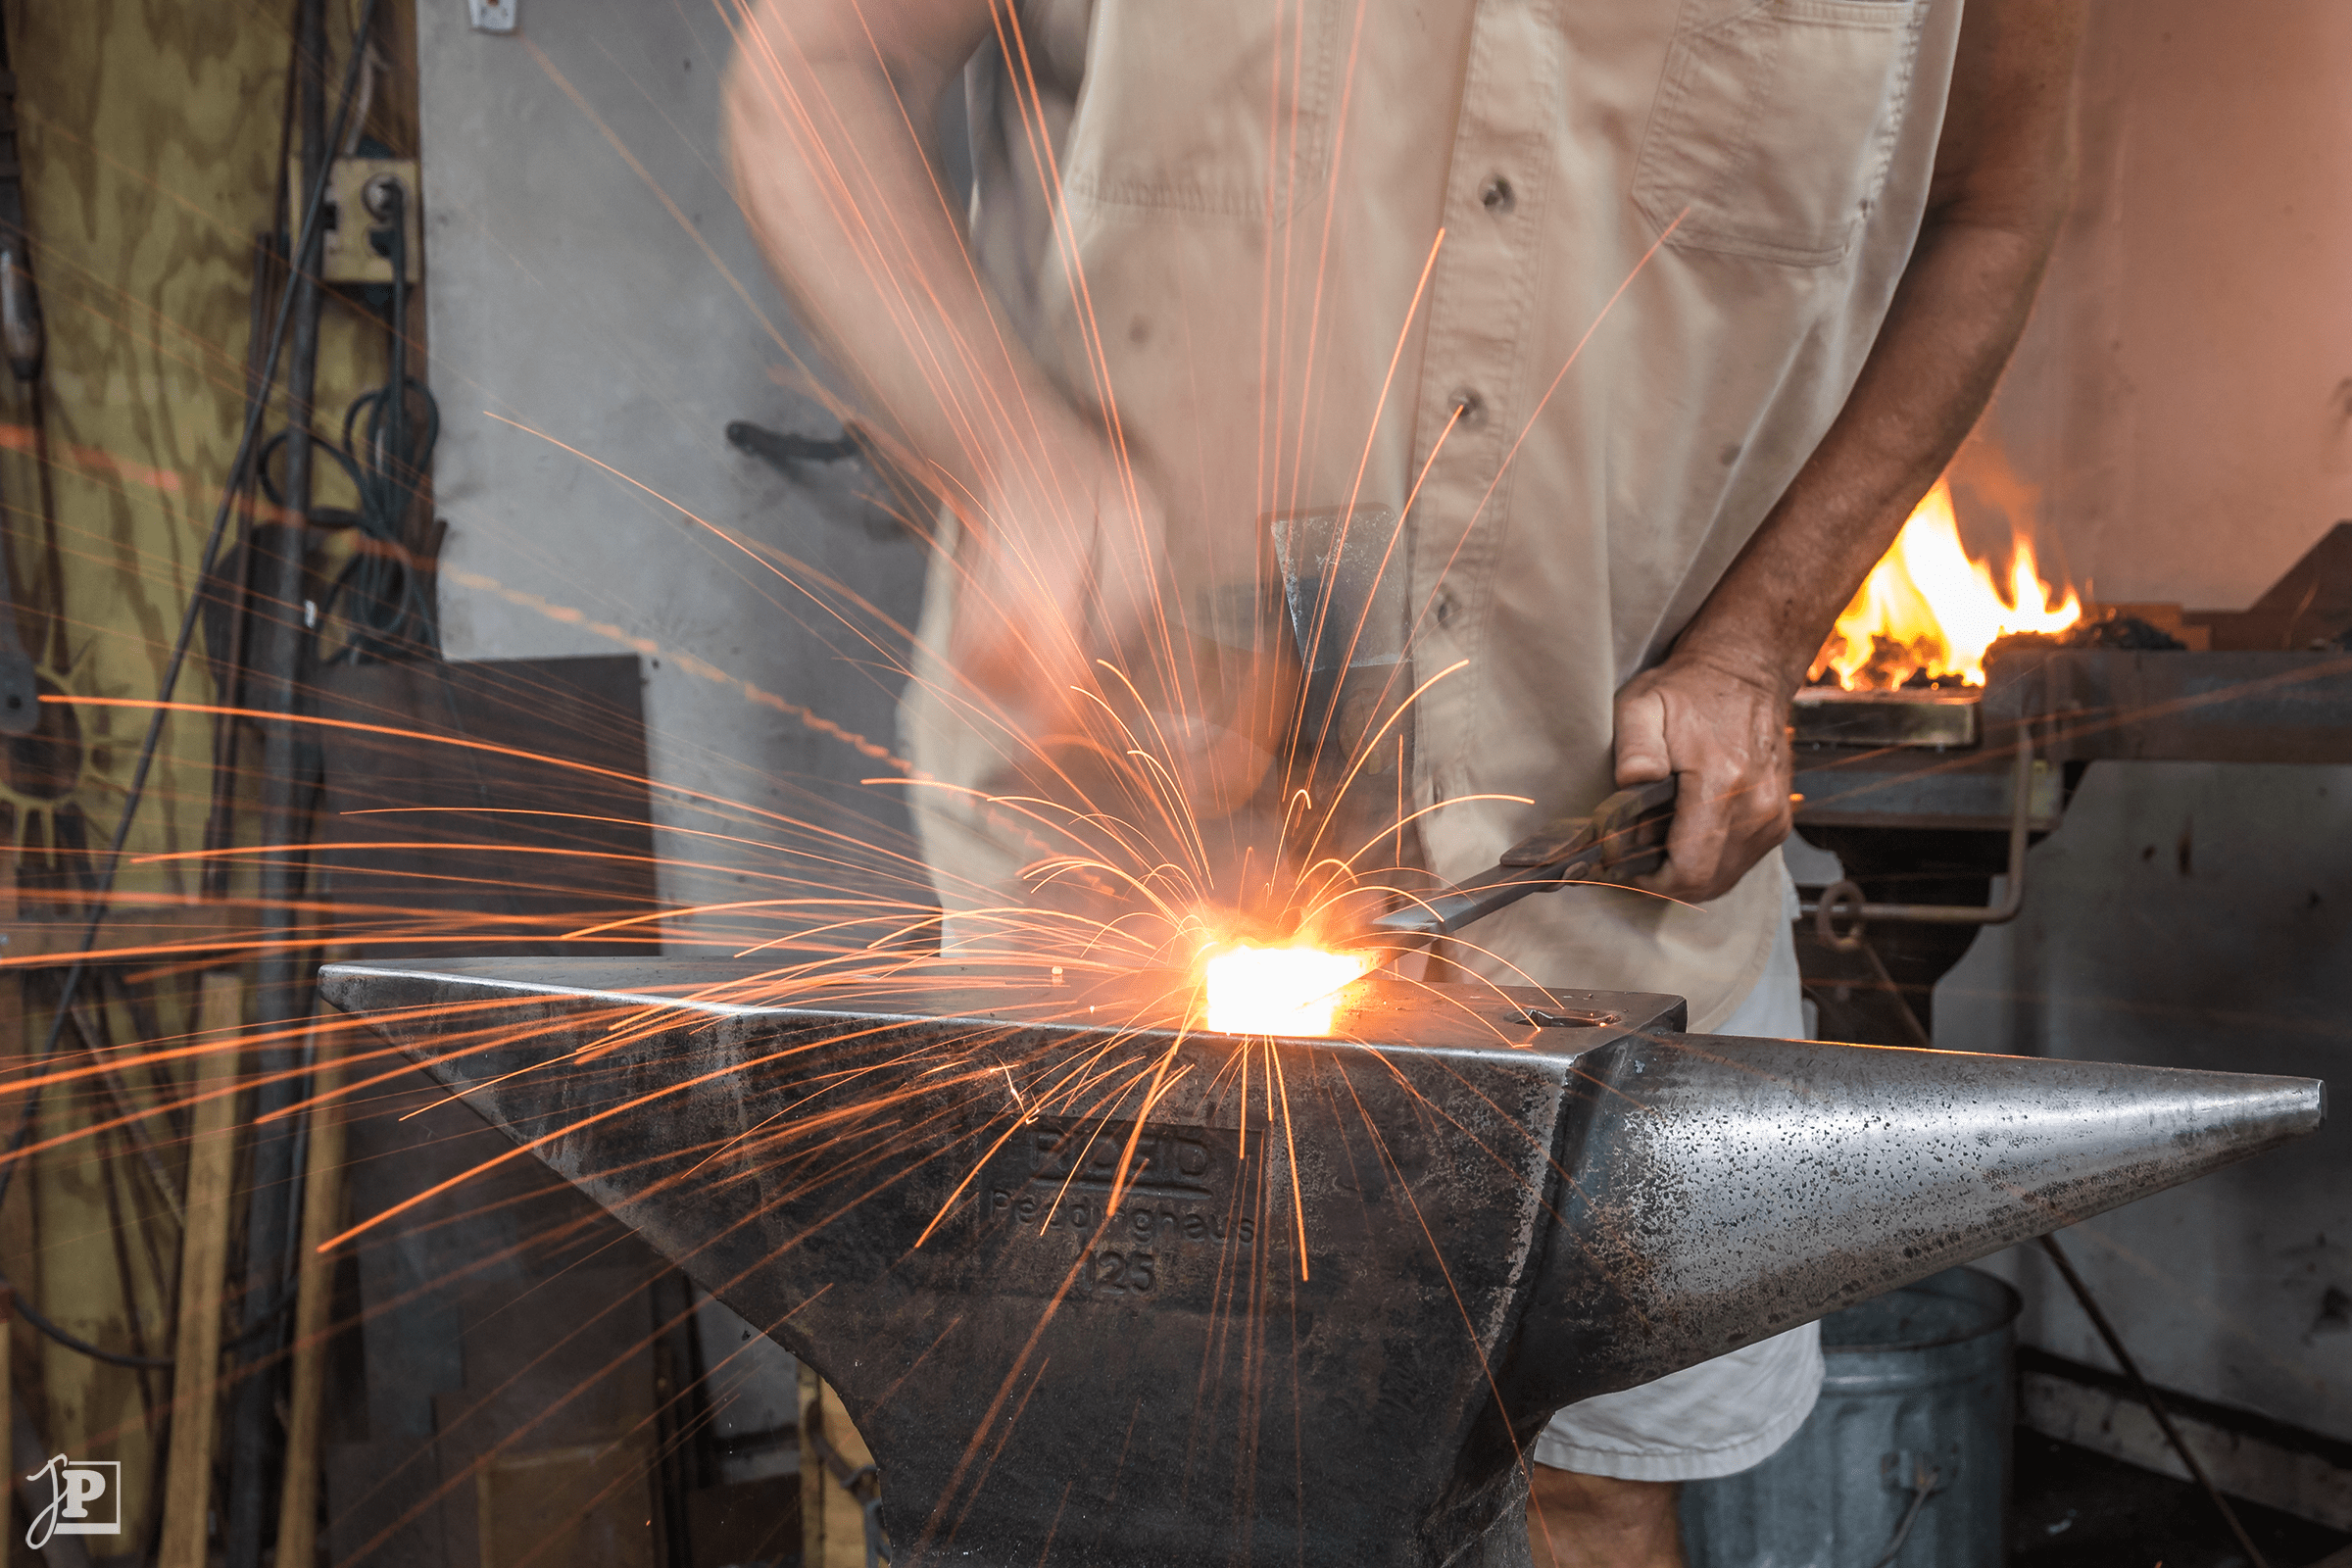
Since the sparks fly when the hammer hits the steel, which is also when it moves the fastest, a shutter speed of 1/10 means that motion blur on the hand and hammer is inevitable. A ghost image of the hammer is captured the moment the flash goes off. Personally, I think it provides a nice balance of capturing motion while showing what it is that is moving.
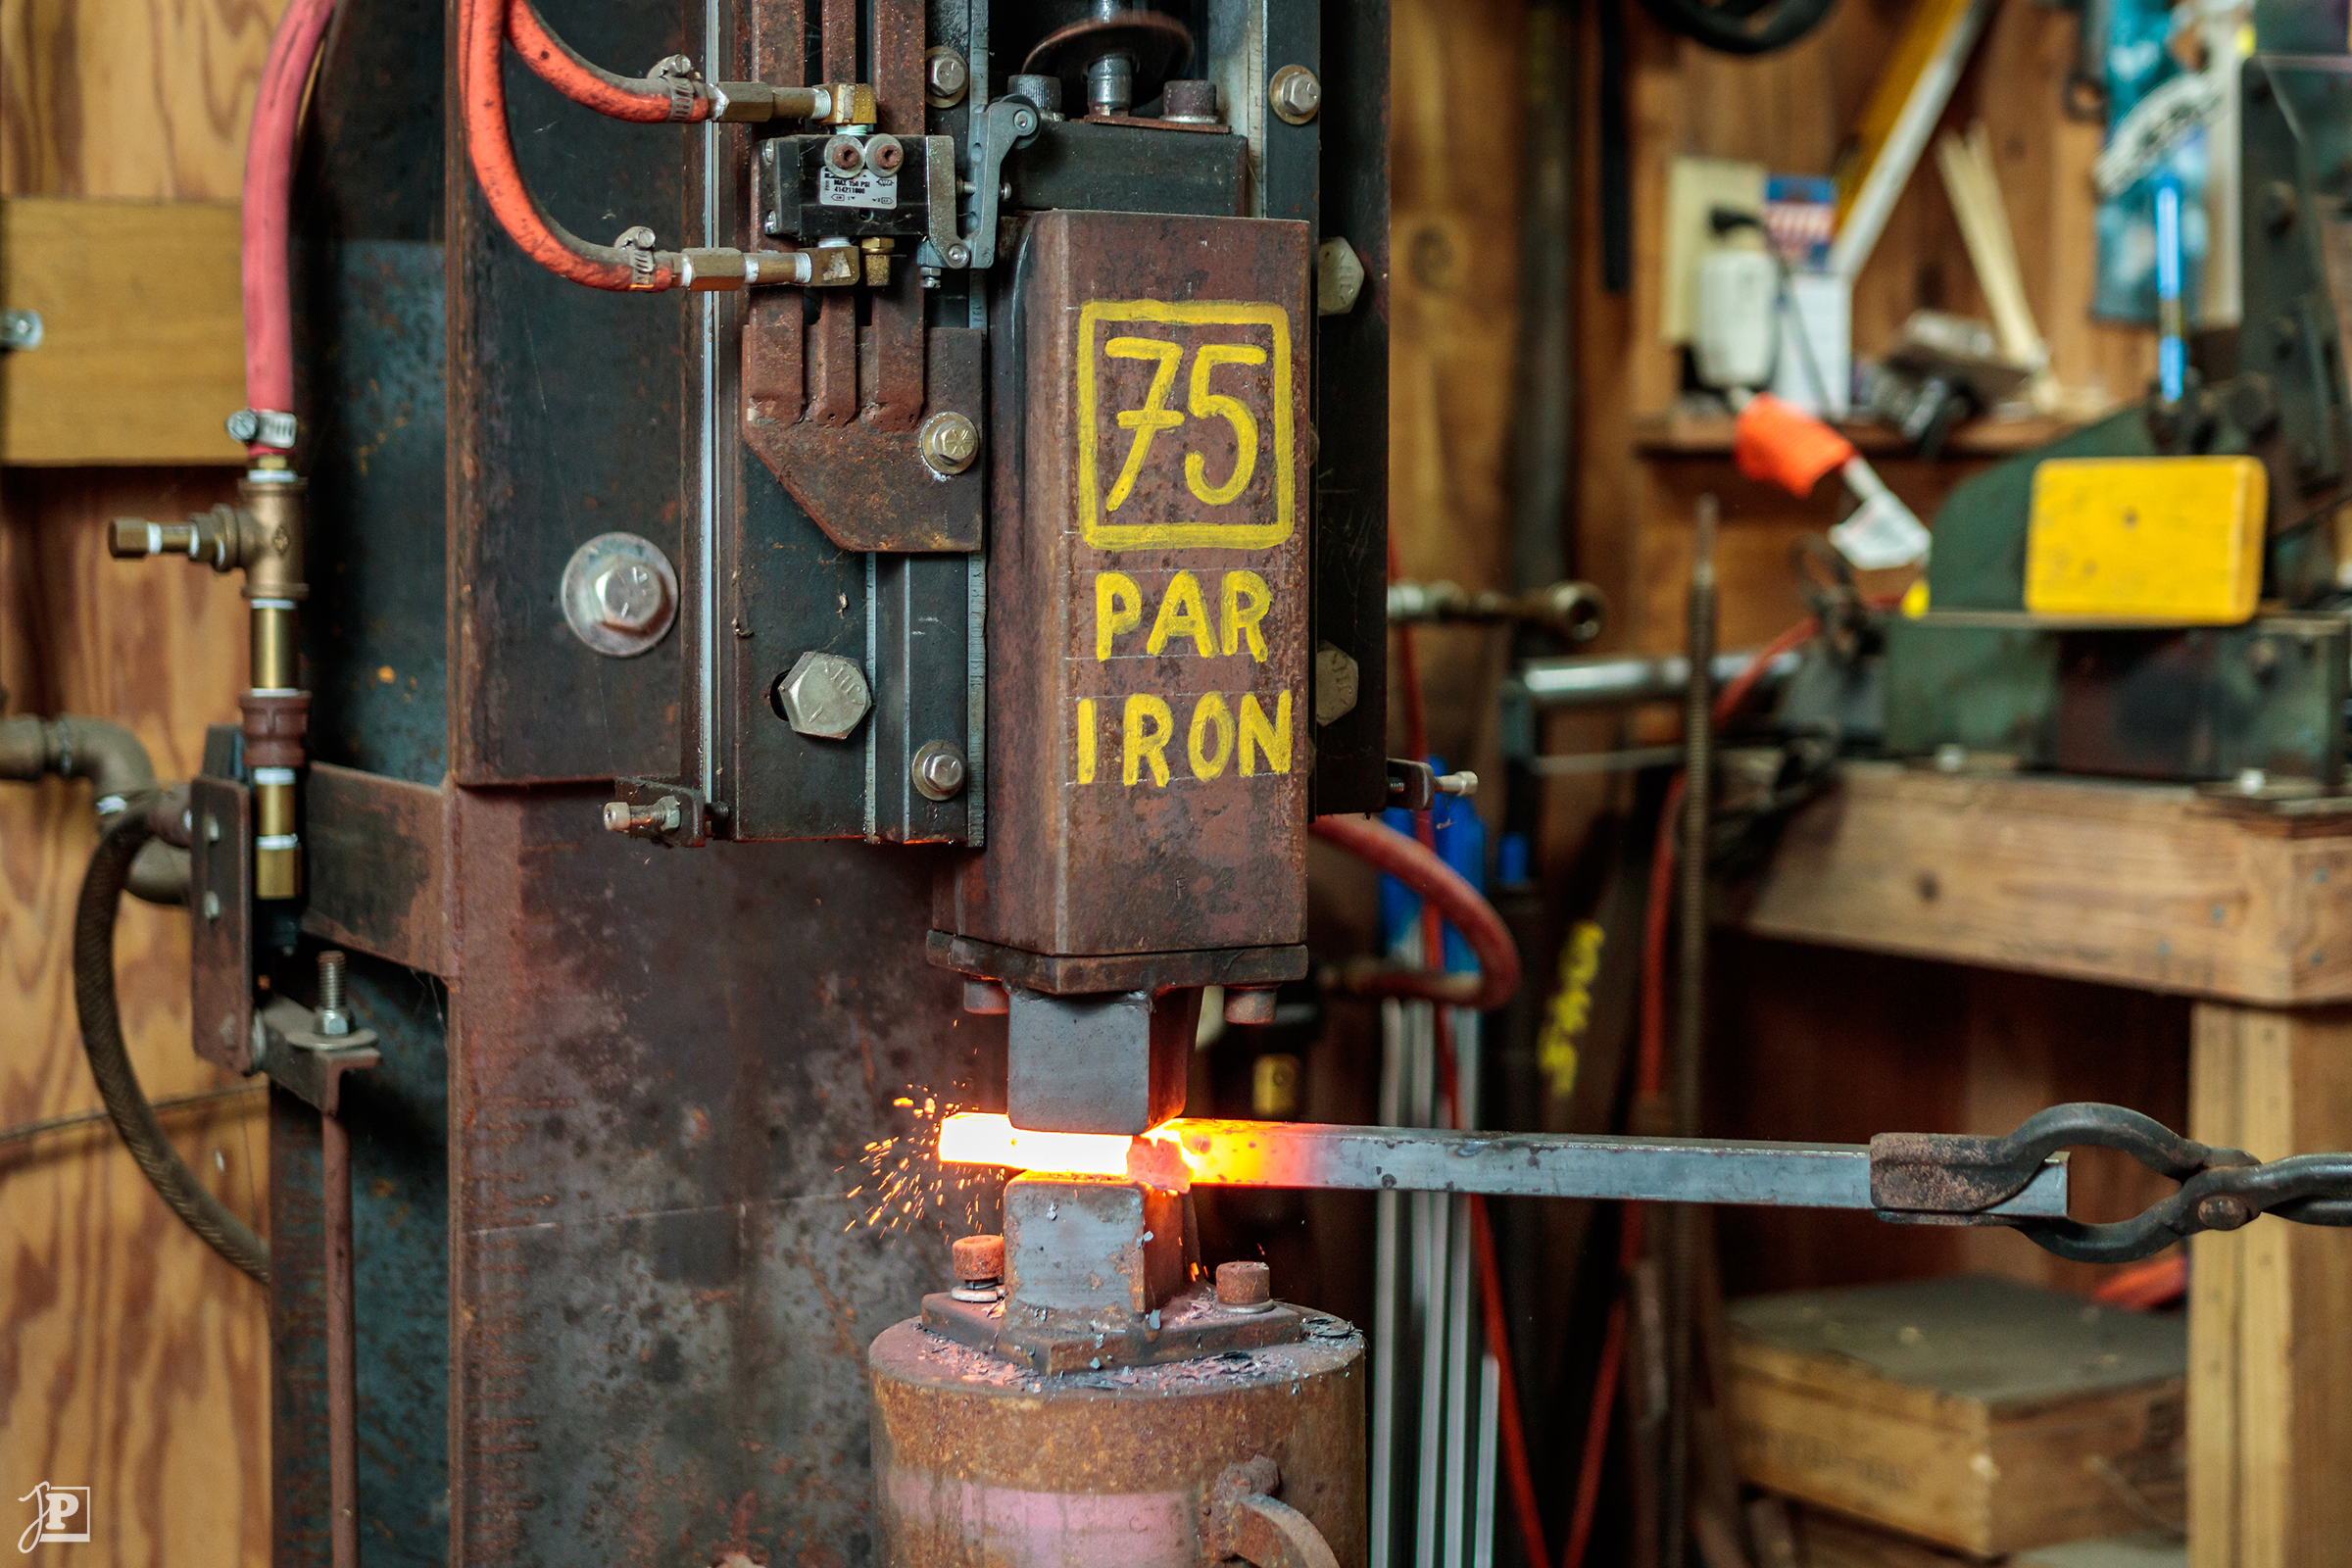
Air Hammer
The last item on the photo list was the air hammer:
Power hammers have been around for quite some time. The first ones were powered by water, just as mills for grinding grain and saws for cutting lumber were. For forging large steel and even for repetitive forging of smaller steel they provide an easier method than hand forging. The hammer seen below is an air hammer that I built myself, this was actually the fourth or fifth one I built (people kept coming by the shop, seeing the air hammers, liking them and buying them). The hammer head is about 75 pounds. Air is provided by a separate large air compressor.
On this shot, once again, the wide-open aperture helps balancing the brightness of the glowing steel and the surrounding scene and also provides some background separation. And as with the forge welding, continuous shooting mode helped capturing the moment when the sparks fly off the work piece.
All in all, I really enjoyed the photo shoot in Phil’s shop, the PARII. It helped me learn a lot about balancing ambient light and external flashes, as well as capturing vs. freezing motion. Since then, Phil has extended his shop, gotten a new air hammer and changed a few other things. I am looking forward to repeating this opportunity as soon as the pandemic will let me travel to the US again.